
We'll create a full-stack application by combining:
- Next.js (with the new App Router), written in React
- Django Ninja, which runs Python
A. This combination offers several advantages:
- Next.js uses React to provide powerful routing system and many great React libraries (by Google search, there are ~5x more React users than Django)
- Django Ninja offers a fast, typed API framework built on top of Django, inspired by FastAPI. I like Django Ninja much more than Django REST Framework. I find it much simpler and elegant
We'll also use the following technologies:
- Typescript for the frontend (Speeds javascript development after you're familiar with it)
- Tailwind CSS for styling (Speeds up writing CSS, avoiding siloing CSS in many/big files)
- SQLite for the database (Simple and fast database)
Let's start 🚀
1. Set up the Django Backend with Django Ninja
First, let's set up our Django project with Django Ninja to serve as the backend API.
Install necessary packages
pip install django django-ninja django-cors-headers
Create a new Django project
django-admin startproject core .
cd backend
python manage.py startapp api
Update settings in backend/settings.py
- Add the following to your
INSTALLED_APPSincore/settings.py:
INSTALLED_APPS = [
    # ...
    'corsheaders',
    'api',
]
- Add CORS settings and middleware to
core/settings.py. This allows requests from Next.js dev server.
MIDDLEWARE = [
    'corsheaders.middleware.CorsMiddleware',
    # ... other middleware
]

CORS_ALLOWED_ORIGINS = [
    "http://localhost:3000",  # Allow requests from Next.js development server
]
Create a simple model in api/models.py
We'll create a simple database model to store items.
from django.db import models

class Item(models.Model):
    name = models.CharField(max_length=100)
    description = models.TextField()

    def __str__(self):
        return self.name
Create schemas in api/schemas.py
- Create a file called
schemas.pyto define our data modelItem. Django Ninja uses this to validate data sent to and from our API.
from ninja import ModelSchema
from .models import Item

class ItemSchema(ModelSchema):
    class Config:
        model = Item
        model_fields = ['id', 'name', 'description']
Create API in api/api.py
- Create a file called
api.py. This is where we'll define our API endpoints. Django Ninja will then automatically generate the API for us. This is "schema-first" development. It's clear (being declarative) and fast to do.
from ninja import NinjaAPI
from .models import Item
from .schemas import ItemSchema

api = NinjaAPI()

@api.get("/items", response=list[ItemSchema])
def list_items(request):
    return Item.objects.all()

@api.post("/items", response=ItemSchema)
def create_item(request, item: ItemSchema):
    return Item.objects.create(**item.dict())
Set up URLs in core/urls.py
- We'll create our top level urls, linking to our admin site and the api app.
from django.contrib import admin
from django.urls import path
from api.api import api


urlpatterns = [
    path('admin/', admin.site.urls),
    path('api/', api.urls),
]
Run migrations and start the Django server
- Run the following commands to create the database tables and start the Django server:
python manage.py makemigrations
python manage.py migrate
python manage.py runserver
Your Django backend with Django Ninja is now set up and running on http://localhost:8000.
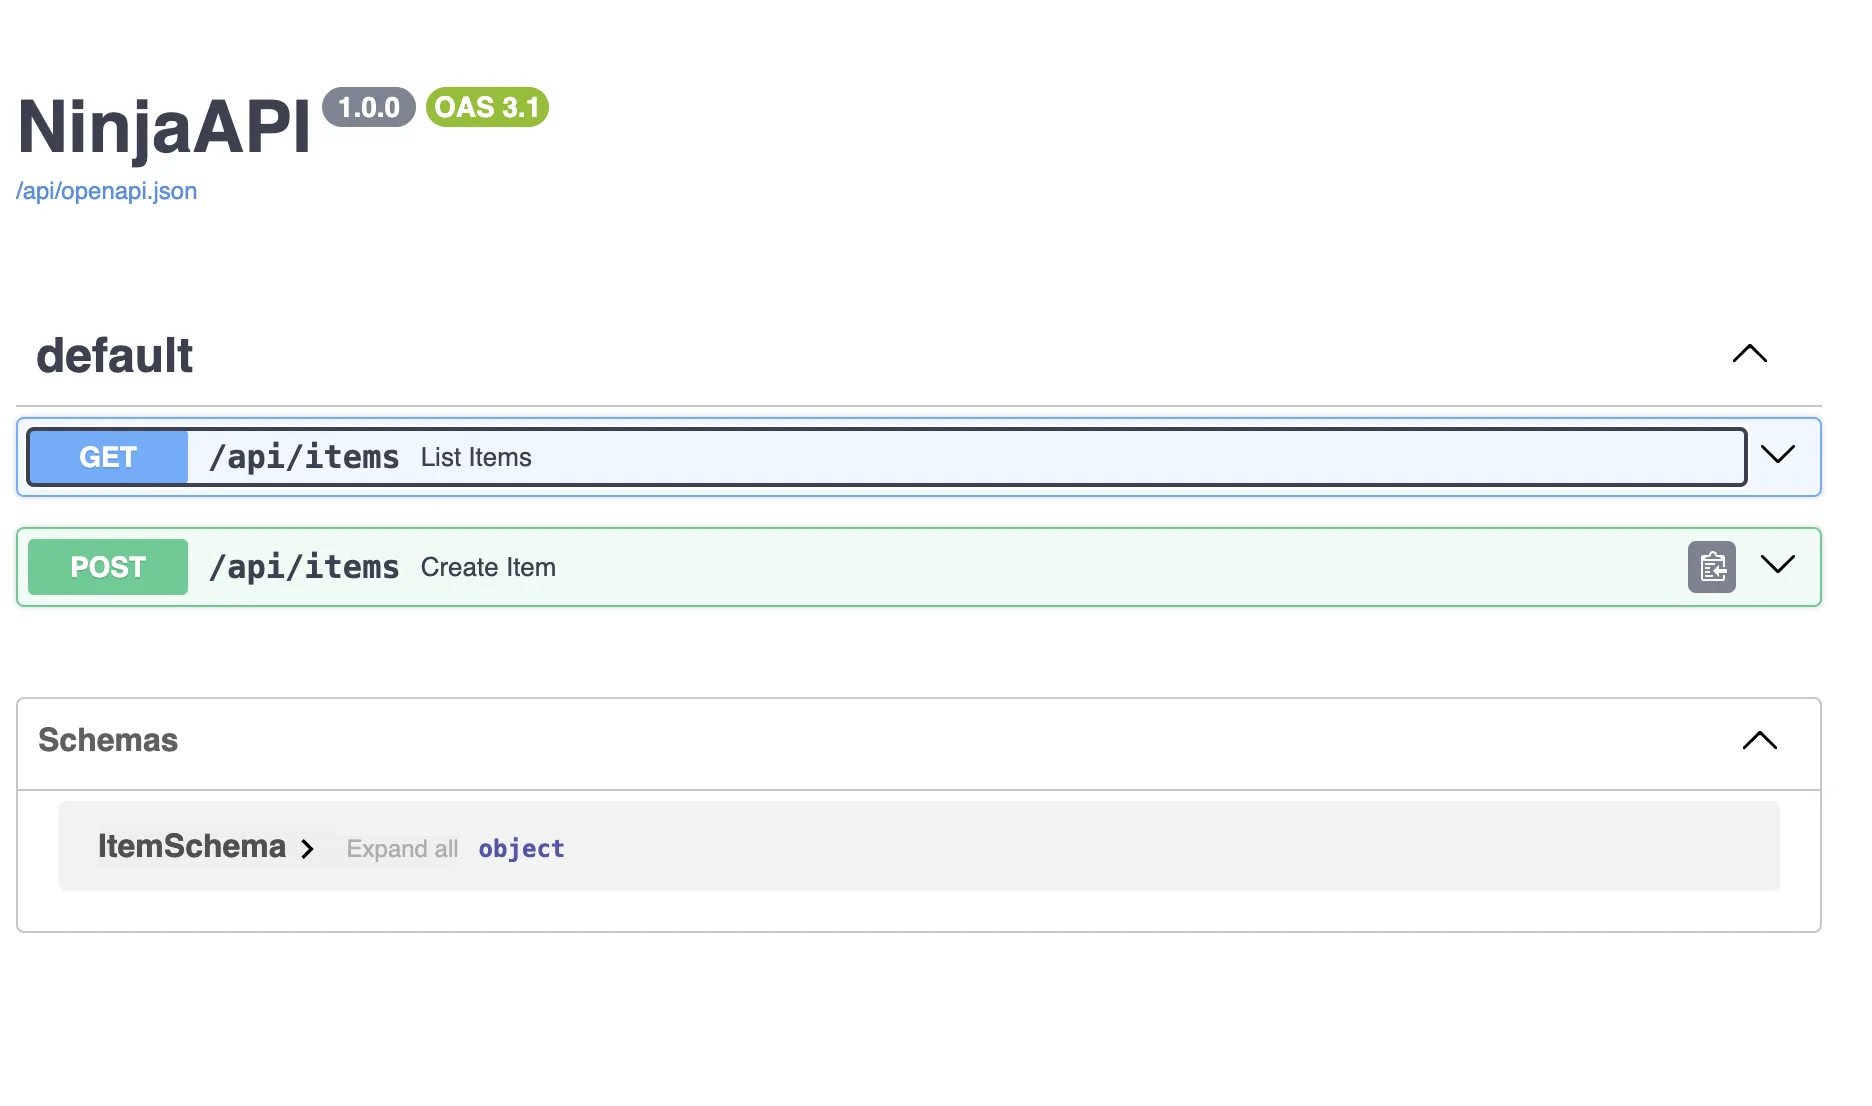
To see Django Ninja's awesome auto-generated docs (using Swagger), visit http://localhost:8000/api/docs. You should see something that looks like this:
2. Set up the Next.js Frontend with App Router
Now, let's create our Next.js frontend. We'll use App Router to consume the Django Ninja API. For background, 'App Router' is the new routing system for Next.js, replacing the previous 'Page Router'.
Create a new Next.js project
We'll create a new Next.js project called ivy.
- Enter the following command in your terminal at the root of your project:
npx create-next-app@latest ivy
When prompted, choose the following options:
- Would you like to use ?javascript Yes
- Would you like to use ESLint? Yes
- Would you like to use Tailwind CSS? Yes
- Would you like to use `src/` directory? No
- Would you like to use App Router? Yes
- Would you like to customize the default import alias? No
You should now see your new Next.js directory called ivy. Next step: running the next app.
Navigate to the frontend directory
cd ivy
Run your Next.js app
npm run dev
- Visit the Next.js app, normally at
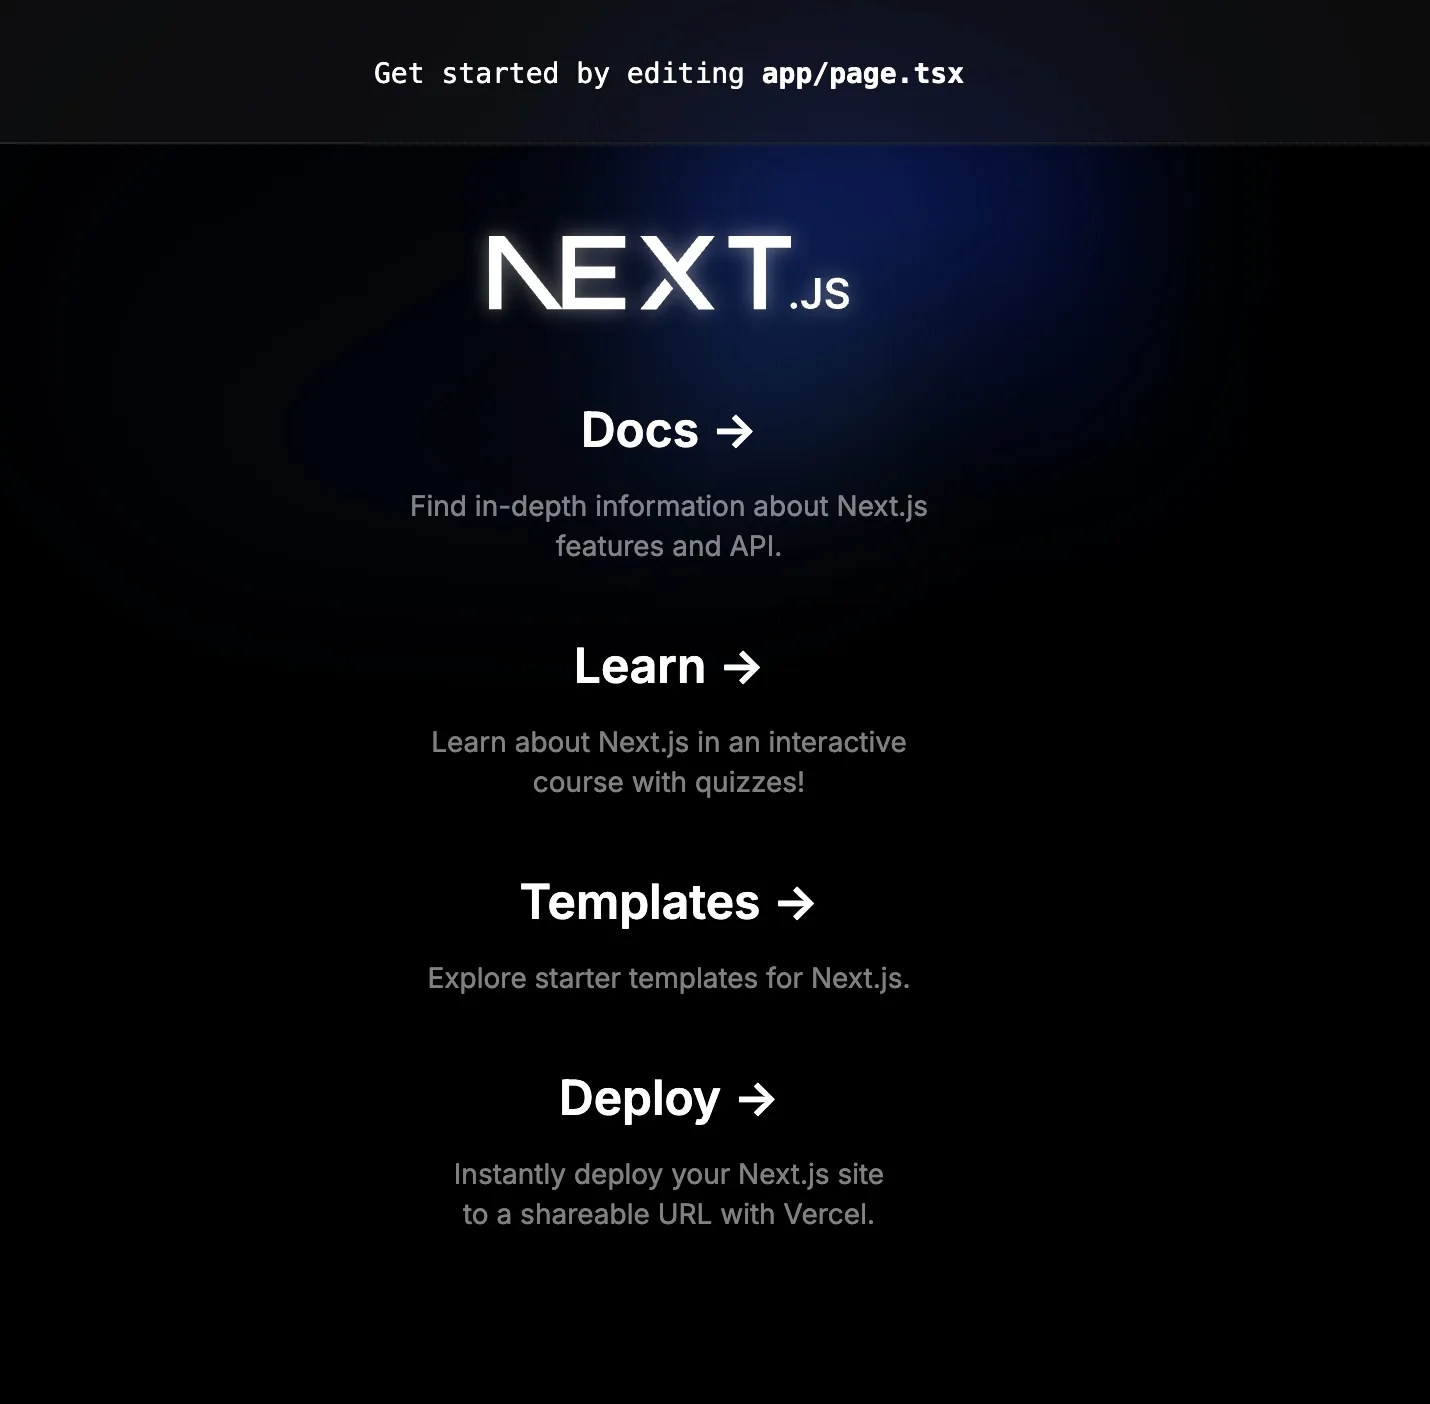
http://localhost:3000. You should see the a placeholder Next.js welcome page that looks like this:
Good progress. Let's now connect Next.js to the Django Ninja backend.
3. Connect Next.js and Django Ninja
Add some data to our Django backend using the Django ORM
- Open a new terminal window (so you have two terminals open).
- Run the Django shell:
python manage.py shell
- Add some data to our Django backend using the Django ORM. You can paste the below into the Django shell.
python manage.py shell
from api.models import Item
# Create some sample items
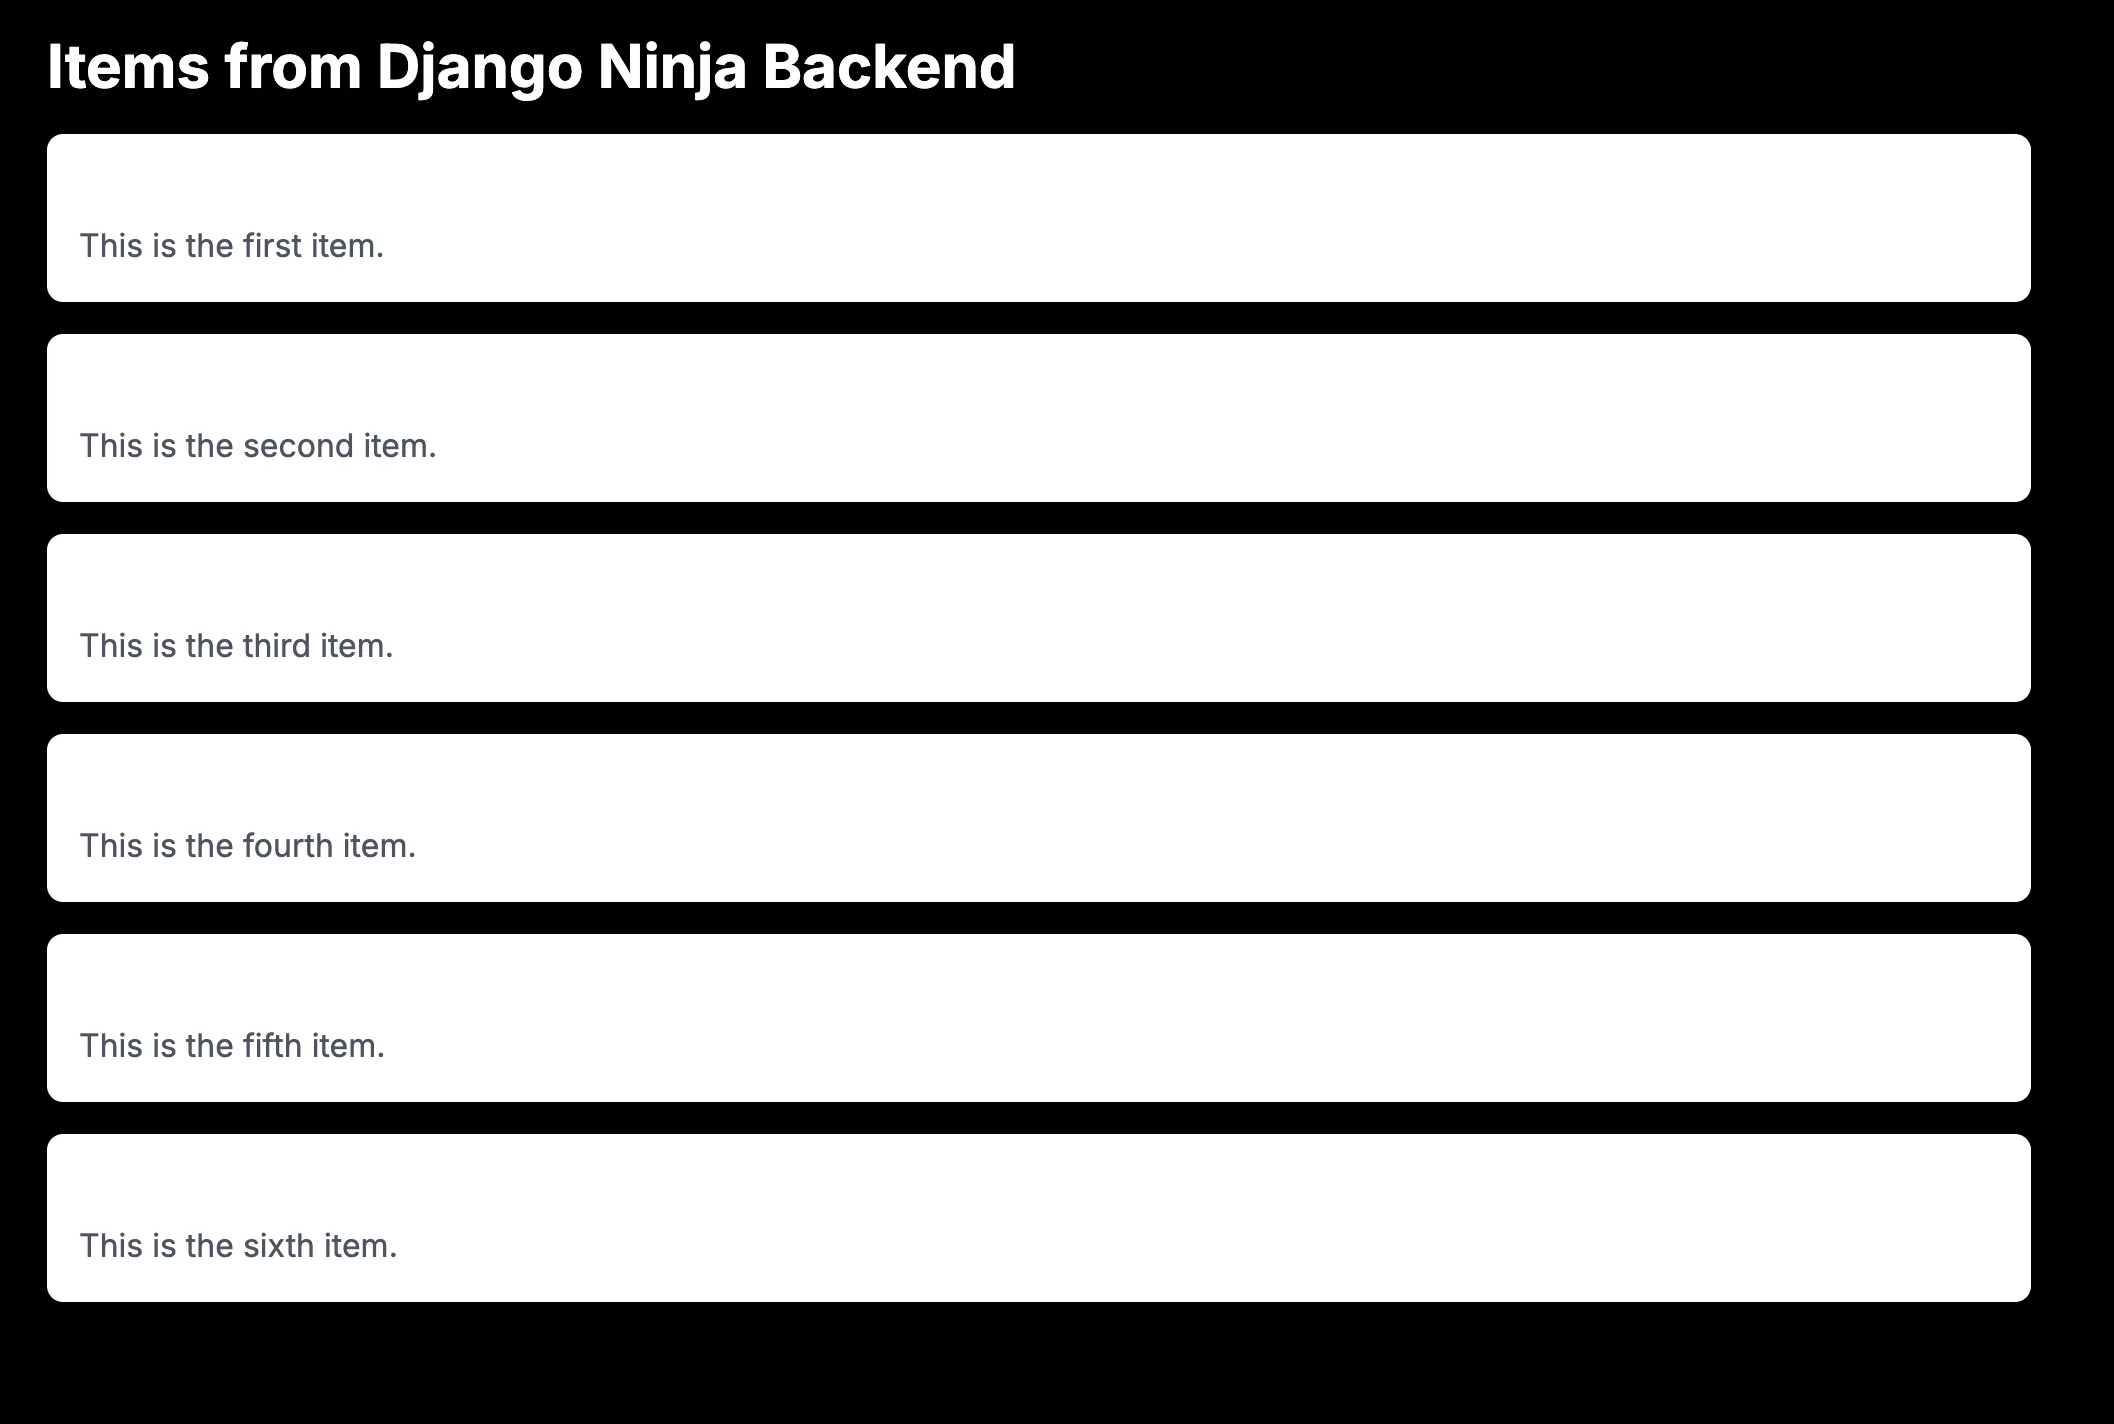
Item.objects.create(name="Item 1", description="This is the first item.")
Item.objects.create(name="Item 2", description="This is the second item.")
Item.objects.create(name="Item 3", description="This is the third item.")
Item.objects.create(name="Item 4", description="This is the fourth item.")
Item.objects.create(name="Item 5", description="This is the fifth item.")
Item.objects.create(name="Item 6", description="This is the sixth item.")
print("Sample items created successfully!")
Create an API file in ivy/utils/api.ts
Next.js runs both a backend server and a frontend client.
We'll create a folder called utils and a file called api.ts to fetch data from the Django Ninja backend.
Paste in the following code into ivy/utils/api.ts.
const API_URL = 'http://localhost:8000/api' // This is the URL to your Django Ninja backend

export interface Item {
  id: number;
  name: string;
  description: string;
}

export async function fetchItems(): Promise<Item[]> {
  const response = await fetch(`${API_URL}/items`);
  if (!response.ok) {
    throw new Error('Failed to fetch items');
  }
  return response.json();
}
Create a page to display our items in frontend/app/page.tsx
Pages are the main building blocks of Next.js apps with App Router.
- Paste the below over everything in
ivy/app/page.tsx:
import { fetchItems, Item } from '../utils/api';

export default async function Home() {
  const items = await fetchItems();

  return (
    <div className="container mx-auto p-4">
      <h1 className="text-3xl font-bold mb-4">Items from Django Ninja Backend</h1>
      <ul className="space-y-4">
        {items.map((item: Item) => (
          <li key={item.id} className="bg-white shadow rounded-lg p-4">
            <h2 className="text-xl font-semibold">{item.name}</h2>
            <p className="text-gray-600">{item.description}</p>
          </li>
        ))}
      </ul>
    </div>
  );
}
Check it out
- Start your next.js server if it's not running already:
npm run dev
- Visit
http://localhost:3000and you should see the items from your Django Ninja backend displayed. Here's what it looks like on my screen:
Your Next.js frontend is now running on http://localhost:3000 and fetching data from the Django Ninja backend using the new App Router and server components.
How does this work?
Here's what we are doing:
- Django Ninja exposes an API endpoint at
http://localhost:8000/api/items - Next.js makes a server-side request to this endpoint using
fetchfunction - Django Ninja processes the request, gets the data from the database, and returns the data as JSON
- Next.js receives the JSON data and renders it in the server component, sending the HTML to the client.
You've connected Next.js and Django Ninja 🎉
Next steps using other guides I've written ✍️
-
Implement authentication. My guide here: Use React with Django Ninja (including Auth) in 15 mins ⚡️
-
Add instant database search with Django. Start with my guide: "Add instant database search with Django and HTMX 🕵️"
-
Integrate AI capabilities into your app, such as chatbots. Start with my guide and tailor : Stream AI chats using Django in 5 minutes (OpenAI and Anthropic) 💧
-
Implement real-time features using server-sent events with Django. Start with my guide and then customise for React and Next: The simplest way to add server sent events to Django 🏺
